

How To Install An Operating System To Your Raspberry Pi
von Satoshi Nakamoto
Your Raspberry Pi doesn’t come with an operating system. This is not a weakness, however, rather a feature that means you can choose from a wide of OSs, each of which can be flashed to an SD card (or microSD card for the Raspberry Pi B+) in a few simple steps. Here’s how to get a new OS installed and running on your Pi – and how to clone your perfect setup for quick disaster recovery.
Operating systems such as the recommended Raspbian, ArchLinux, Risc OS and even Android come ready to run on your Raspberry Pi. I’ll show you the two main ways add an operating system – and once you’ve got your Pi setup how you want it, we’ll look at how to clone the card so that it can be restored following errors (or for temporary reuse of your SD card).
The following tutorials assume that you have a basic Raspberry Pi package and Windows to manage your SD card writing and cloning.
Flash An OS To SD And Boot Your Raspberry Pi
Whichever operating system you download for your Raspberry Pi, the process of writing it to an SD card is the same. However, there are some differences in SD card writing between desktop operating systems. You’ll also need to ensure that your card is blank and formatted, and at least 2 GB.
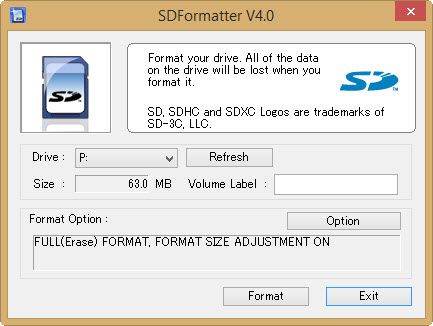
For Windows users (and also those of you with Mac OS X) the tool of choice for writing a Raspberry Pi OS image to SD card is SD Formatter, from the SD Association. With the card inserted into your computer’s card reader, and ensuring you have the correct Driveletter selected in the drop down menu, open the Option menu and select Full (Erase) and On. This ensures that the full capacity of the storage card will be available.
Click OK, then Format to begin.
To write the disk image, use Win32DiskImager, available from Sourceforge. You may need to run with administrator privileges. Select the correct drive letter for your SD card, browse to the image file and click Write to commence the process. Win32DiskImager will inform you when the data has been written.
If writing the disk image seems too much hassle or is beyond your abilities, it is possible to purchase SD cards with Raspbian pre-installed.
Booting Raspbian For The First Time
With Raspbian installed, you’ll need to login with the following credentials:
Username: pi
Password: raspberry
For other operating systems, check the documentation to find the default login credentials.
Remember that the password will not be displayed as you type it; there are no Windows-style * symbols representing the letters. Instead, it will appear that you haven’t entered a password. This is a security feature in Linux to prevent people guessing the length of your passphrase. Just type the password regardless.
In Raspbian, you can change your password by running

And selecting the Change Password option.
Install Raspbian, XBMC, Risc OS, OpenElec & ArchLinux Easily With NOOBS
For a simpler, more streamlined install of the more popular Raspberry Pi distros such as Raspbian, ArchLinux, XBMC and OpenElec media centres, as well as Risc OS and Pidora – you can employ NOOBS, the New Out Of Box Software installation system.
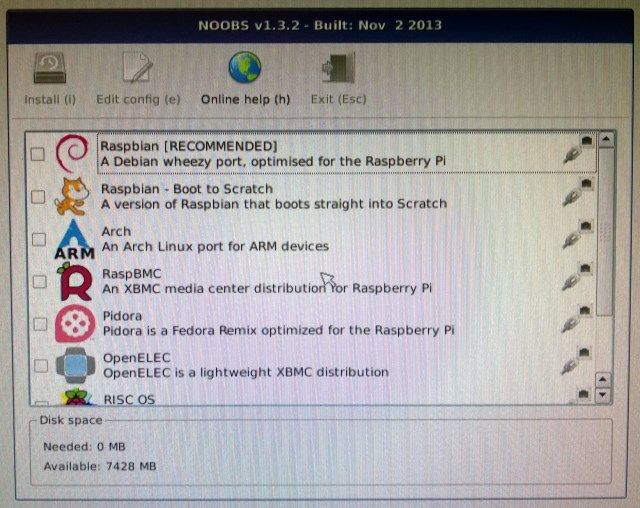
NOOBS is available from http://www.raspberrypi.org/downloads and doesn’t require “writing” to SD card in the way Raspbian and other Pi operating systems are. You will need a card greater than 4GB and should use the SD Formatter tool to format (Full Erase On, Format Size Adjustment On). When downloading NOOBS, note that offline and online installers are available, differing in size; the smaller download will require that your Raspberry Pi is connected to the Internet via Ethernet.
A keyboard and/or mouse will be required to install an OS with NOOBS, as will a HDMI display.
With the Raspberry Pi booted into the NOOBS interface, you can choose your operating system(s). Our full guide to NOOBS includes everything you need to know about this method of setting up a Raspberry Pi OS.
Perfecting Your Raspberry Pi OS
Different Raspberry Pi projects require a varying amount of software; it really all depends on what you’re planning to do.
For instance, if you want to use your Raspberry Pi as a media centre, then you might use NOOBS to install XBMC or (the better option, in my opinion) OpenElec.

With this done, you will then need to install various updates from within the media centre software (much as you would if you had installed Raspbian). There may be other applications that you need, add-ins for the media centre such as Vimeo or YouTube, perhaps the TED Talk channel, etc.
As with any computer system, installing the operating system is only the first step. Updates, optional software and other tools will also need to be added before you’re happy that the Raspberry Pi is ready for its intended use. The same process would be followed if you were configuring your Pi as a wireless print server, perhaps, or even webserver.
Once this is done, you should have your Raspberry Pi installation perfected.
Disaster Management: Cloning The OS
The point at which you’re happy with the installed OS is precisely when you should make a clone of it. This is a full backup image of the SD card saved to your hard disk drive (or second SD card) that can be easily flashed should you run into trouble.
Windows users can again employ Win32DiskImager here, ensuring that the perfected Raspberry Pi SD card is inserted in your Windows card reader before launching the utility.

Find the Image File field, and browse to the folder where you will be saving your SD card image; in the Device box, select the drive letter of the SD card, and after confirming both are correct, click Read to begin the cloning, following any on-screen instructions. Give the process time to complete before proceeding.
Should you need to revert the SD card back to its “perfect” state later on, you’ll need to remove all partitions (WIN+R to launch Disk Management, right-click the SD card and select Delete) before restoring the image. You might also reformat using SD Formatter, as explained above.
Again using Win32DiskImager, browse for the image file, set the Device drive letter and then click Write. Once the process is complete, your SD card will be reverted to the “perfect” configuration you worked on earlier, and your Raspberry Pi should be ready to put to use once more.
Find out more in our comprehensive explanation of cloning your Raspberry Pi SD card.
Conclusion: Make The SD Card Work For You
One thing is clear about the Raspberry Pi: it relies on the SD card to on extent or another. As such, understanding how to use this type of media with the little computer is vital.
Writing an operating system to SD card is the Raspberry Pi equivalent of installing an operating system. As you’ll have noticed, it’s much quicker than installing Windows to a HDD, and with NOOBS doing the hard work, even simpler!
We can’t underline enough how important it is to make an image of your SD card. With the various ways in which you can find your Pi not working correctly, having a quick restore file saved to a HDD is really quite important.
Have any thoughts or observations? Do you want to ask a question about this article? Please use the comments below.
Source makeuseof.com
Read the full article

Satoshi Nakamoto








Keine Verbindung
Verbindung wird wiederhergestellt
Etwas ist schiefgelaufen
Wir sind gleich wieder da