
WordPress settings which are recommended and Essential
If you are a WordPress beginner and yet to start a blog, you can start by reading our previous article on how to start a blog before you read this article on recommended WordPress settings. Click on the link above to read on how to start a blog.
If you are still reading this article, I presume you already created your WordPress blog and want to know more about highly recommended WordPress settings.
This article is for you and it will guide you to the core settings of a WordPress blog. These Detailed WordPress settings are highly recommended as they have lots of advantages ranging from setting SEO friendly permanent links, getting your blog post quickly and easily indexed by search engines, setting your images to appear uniquely and all the same on every posts, except you choose to customize them.
Without much ado, lets delve straight in the WordPress settings highly recommended for every newly created WordPress website. You have to ensure to have these settings done before you start writing your first blog post.
Before you start implementing these detailed WordPress settings, ensure to delete WordPress default pages, posts, Categories and comments. Your newly installed WordPress by default comes with a "sample page", "Hello world post", "WordPress Commenter" and an "Uncategorized Category"

Login to your WordPress dashboard and click on Posts, once it opens as shown in the screenshot above, move your mouse pointer to trash and delete the default post. Do the same for pages, comments and category. Once you have done the above steps, you are now ready to start implementing the WordPress settings.
Here, you will see your site title and tagline you chose at the time of installation. Our concern here is the role of of other users of your site, set it to contributor and do not check the box, "anyone can register" as you can always get e-mail addresses of people who are interested in blogging or guest blogging on your site and add them from the backend yourself and WordPress will send them an e-mail to set up their password.
By not checking the "anyone can register box" , you are consciously stopping spam registration. Scroll downward and choose your time zone. Now are set to move to other WordPress settings

Our concern here is to set a default category and a list of ping websites. Your newly installed Wordpress comes with just one pinger( http://rpc.pingomatic.com/ ). Copy the list of ping sites we have listed below and follow the screenshot to set yours up. As seen below, I have set up my default category to "Blogging Basics", and that's because I will be writing more on the basic of blogging. Popular wordpress pinglist I have on this website:
http://rpc.pingomatic.com/
http://rpc.icerocket.com:10080/
http://blogsearch.google.com/ping/RPC2
http://1470.net/api/pinghttp:
//api.feedster.com/pinghttp
://api.moreover.com/RPC2
http://api.moreover.com/ping
http://api.my.yahoo.com/RPC2
http://api.my.yahoo.com/rss/ping
http://bblog.com/ping.php
http://bitacoras.net/ping
http://blog.goo.ne.jp/XMLRPC
http://blogdb.jp/xmlrpc
http://blogmatcher.com/u.php
http://bulkfeeds.net/rpc
http://coreblog.org/ping
/http://mod-pubsub.org/kn_apps/blogchatt
http://www.lasermemory.com/lsrpc/
http://ping.amagle.com/
http://ping.bitacoras.com
http://ping.blo.gs/
http://ping.bloggers.jp/rpc/
http://ping.cocolog-nifty.com/xmlrpc
http://ping.blogmura.jp/rpc/
http://ping.exblog.jp/xmlrpc
http://ping.feedburner.com
http://ping.myblog.jp
http://ping.rootblog.com/rpc.php
http://ping.syndic8.com/xmlrpc.php
http://ping.weblogalot.com/rpc.php
http://ping.weblogs.se/
http://pingoat.com/goat/RPC2
http://rcs.datashed.net/RPC2/
http://rpc.blogbuzzmachine.com/RPC2
http://rpc.blogrolling.com/pinger/
http://rpc.icerocket.com:10080/
http://rpc.newsgator.com/
http://rpc.technorati.com/rpc/ping
http://rpc.weblogs.com/RPC2
http://topicexchange.com/RPC2
http://trackback.bakeinu.jp/bakeping.php
http://www.a2b.cc/setloc/bp.a2b
http://www.bitacoles.net/ping.php
http://www.blogdigger.com/RPC2
http://www.blogoole.com/ping/
http://www.blogoon.net/ping/
http://www.blogpeople.net/servlet/weblogUpdates
http://www.blogroots.com/tb_populi.blog?id=1
http://www.blogshares.com/rpc.php
http://www.blogsnow.com/ping
http://www.blogstreet.com/xrbin/xmlrpc.cgi
http://www.mod-pubsub.org/kn_apps/blogchatter/ping.php
http://www.newsisfree.com/RPCCloud
http://www.newsisfree.com/xmlrpctest.php
http://www.popdex.com/addsite.php
http://www.snipsnap.org/RPC2
http://www.weblogues.com/RPC/
http://xmlrpc.blogg.de
http://xping.pubsub.com/ping/
http://rpc.copygator.com/ping/
http://blogsearch.google.ae/ping/RPC2
http://blogsearch.google.at/ping/RPC2
http://blogsearch.google.be/ping/RPC2
These Pingers are very important in that they automatically notify search engines and websites directories each time you have a new post published on your website. You don't have to wait forever for your posts to get indexed by search engines. Adding these pingers to your services updater also inform search engine crawlers of updates you make in your posts and pages, so basically, this is your first step to search engine optimization. Copy the list of Pingers above and follow the screen shot to add them to your website:

Now you have set up your default category and got your update services inserted, let's move to the next step of essential Wordpress settings.

Here, you get a chance to set the number of blog post you want to be displayed on the home page or blog archive page. You can also choose to have full articles or summaries in your feeds. Search Engine visibility box should be left unchecked as you definitely want search engines to index your posts. Select how you will want your related posts to be displayed base on your taxonomies of preference.
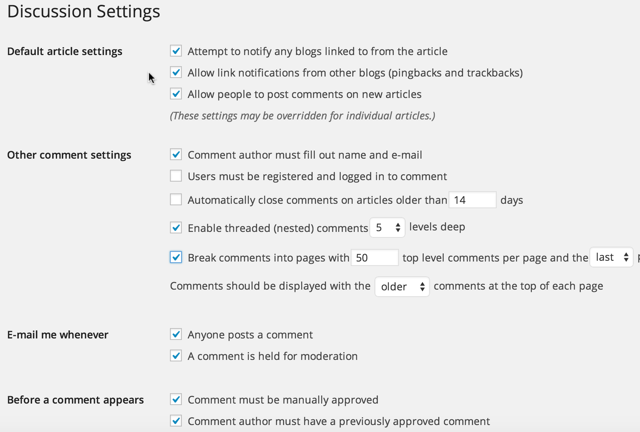
Now, go to Settings > Discussion.
This can get confusing if you don’t know what to do here. But just follow the above screenshot and you’ll be good.
This is very important as it will generally improve the way WordPress gets to handle your images. If you do not control or get to compress your images, sooner than later, the bulky images will affect the speed of your website and for sure you don't want that to happen, so the first step towards taking care of the sizes of images you upload on your website is to do a proper media setting.
Follow the screen shot below to properly configure your wordpress media settings

the above settings will ensure that the sizes of your thumb nails, medium and large pictures are unique site wide except in a case you choose a custom size. There are lots of plugins to help compress your images once they are uploaded so that your website don't get bloated and slowed down because of bulky and over sized images.
I will be writing an advance list of WordPress Plugins which shall inlcude plugins for compression. For now, you can also read:
10 WordPress Plugins to Start a Blog with
The next and very important setting on this list is the Permanent Links!
Why is it so important? It's very important because it has a vital role to play with the search engine Optimization of your articles and links. By default, permanent links of newly installed WordPesses are set as shown on the screen shot below

When I started my second blog, I knew nothing about setting my permanent links to be SEO friendly! Whenever I pulish a post I will always have a url like:
https://www.cameroonianbeauties.com/2017/03/12/afro-pop-2017-makossa/...
You immediately notice that the date comes first in the url before the post name.
It's highly recommended to set your permanent link as shown below before you write and publish your first blog post:

When you set your permanent links to post name, the urls of your articles will look like the link below:
https://www.cameroonianbeauties.com/afro-pop-2017-makossa/.
This is more SEO friendly than the one with date before the post name. This setting is recommended to do before you publish your first blog post because if you get to do it after you have written, published and shared your post, you are going to have lots of 404 error pages (broken links).
Not to worry for those who didn't do the permanent link setting before writing blog post. You can install a 302 redirection plugin which will help identify all broken links and you can manually redirect them to the new and permanent links.
The last setting on this list is the WordPress Directory Browsing
By default when your web-server does not find an index file (files like index.html or index.php), the web-server will on its on display any index page showing the contents of the directory. This is actually a lope hole and an easy access point for hackers. This reveals valuable information needed to exploit a vulnerable WordPress plugin, theme or your server in general. It becomes very imperative for you to disable Your WordPress Directory Browsing.
In order to disable your WordPress directory browsing, you will need to edit your WordPress .htaccess file.
The easiest way for you to edit your WordPress .htaccess file install, activate and set up the Yoast SEO plugin. Once you have effectively set up the Yoast SEO plugin, click on tools and on the next page click on file editor as show on the screen shot below
Read More About Yoast SEO and Other Recommended Plugins

Once the File Editor opens, add the following line of code to your htaccess file and make sure it's at the bottom. See screen shot below:
CODE TO BE ADDED:
Options All -Indexes

This will disable directory browsing which is a very important step for maintaining the security WordPress Blog.
If you find this post helpful, kindly hit the share buttons! Share with friends and other bloggers you think the information in this post will be beneficial to as well.
You can use the comment box below to add more points.
Thanks for reading.
How to increase Domain Authority
Click to Post