
![Ultimate Guide: How to Write, Optimize and Promote Blog Posts [+Checklist]](https://images.torial.com/HLKI_PF0u06fY53BeWhuA99_8B0=/https%3A%2F%2Fwww.blog2social.com%2Fen%2Fblog%2Fwp-content%2Fuploads%2F2019%2F02%2FUltimate-Guide-for-Bloggers.png)
The following guide & checklist for bloggers will help you to write blog posts, optimize and to promote your blog posts in less time for more traffic and conversion on your blog.
To make your blog stand out you have to make sure that your blog content is awesome, catchy and sticky. You should also make sure that your blog posts are user-friendly as well as SEO-friendly. Most important is the promotion of your blog posts using social media, content syndication and networking with influencers.
Creating unique content that stands out from millions of other reading options has become more difficult than ever. Just take a look at the internet life stats on the millions of blog posts that are published per day. Every blogger has to work hard to get to the top of the ever-growing blogosphere.
But it takes more than simply good content or great design to create a brilliant blog post. Even if you have a top rocking topic for your audience, there is still a lot to remember for crafting a solid blog post worth reading. You need a system that guides you through the process of streamlining your blog posts, regardless of the length, the type, or the content of your post.
Once you have written a new blog post and you are ready for publishing, just take a short break and check if you thought of everything to turn your post from good to great. Once you've put so much effort into writing your post, it would be stupid to forget some minor things that can crash your potential.
A checklist is an ultimate time-saving device for writing and promoting flawless blog posts. Following a checklist makes sure you don’t forget anything, even if you have a tight deadline to meet.
Get your free complete guide & checklist on How to Write, Optimize and Promote Blog Posts
This article provides you with a comprehensive guide and checklist to tick off before and after you hit the publish button. The additional checklist is loaded with tons of useful tips for writing, formatting, SEO-optimizing and promoting your posts. And, we also included tips for tools to help you tackle your tasks in no time to make your writing life a lot easier.
Every pilot works with a checklist before every takeoff, so don't think you don't need one, just because you have already written a couple of posts.
Download the Ultimate Guide for Bloggers
This is your free downloadable ultimate guide on How to Write Perfect Blog Posts, Optimize your Posts for SEO and Promote Your Posts for Top Performance. The included checklist will help you to cross-check you have not forgotten anything before & after hitting the publish button.
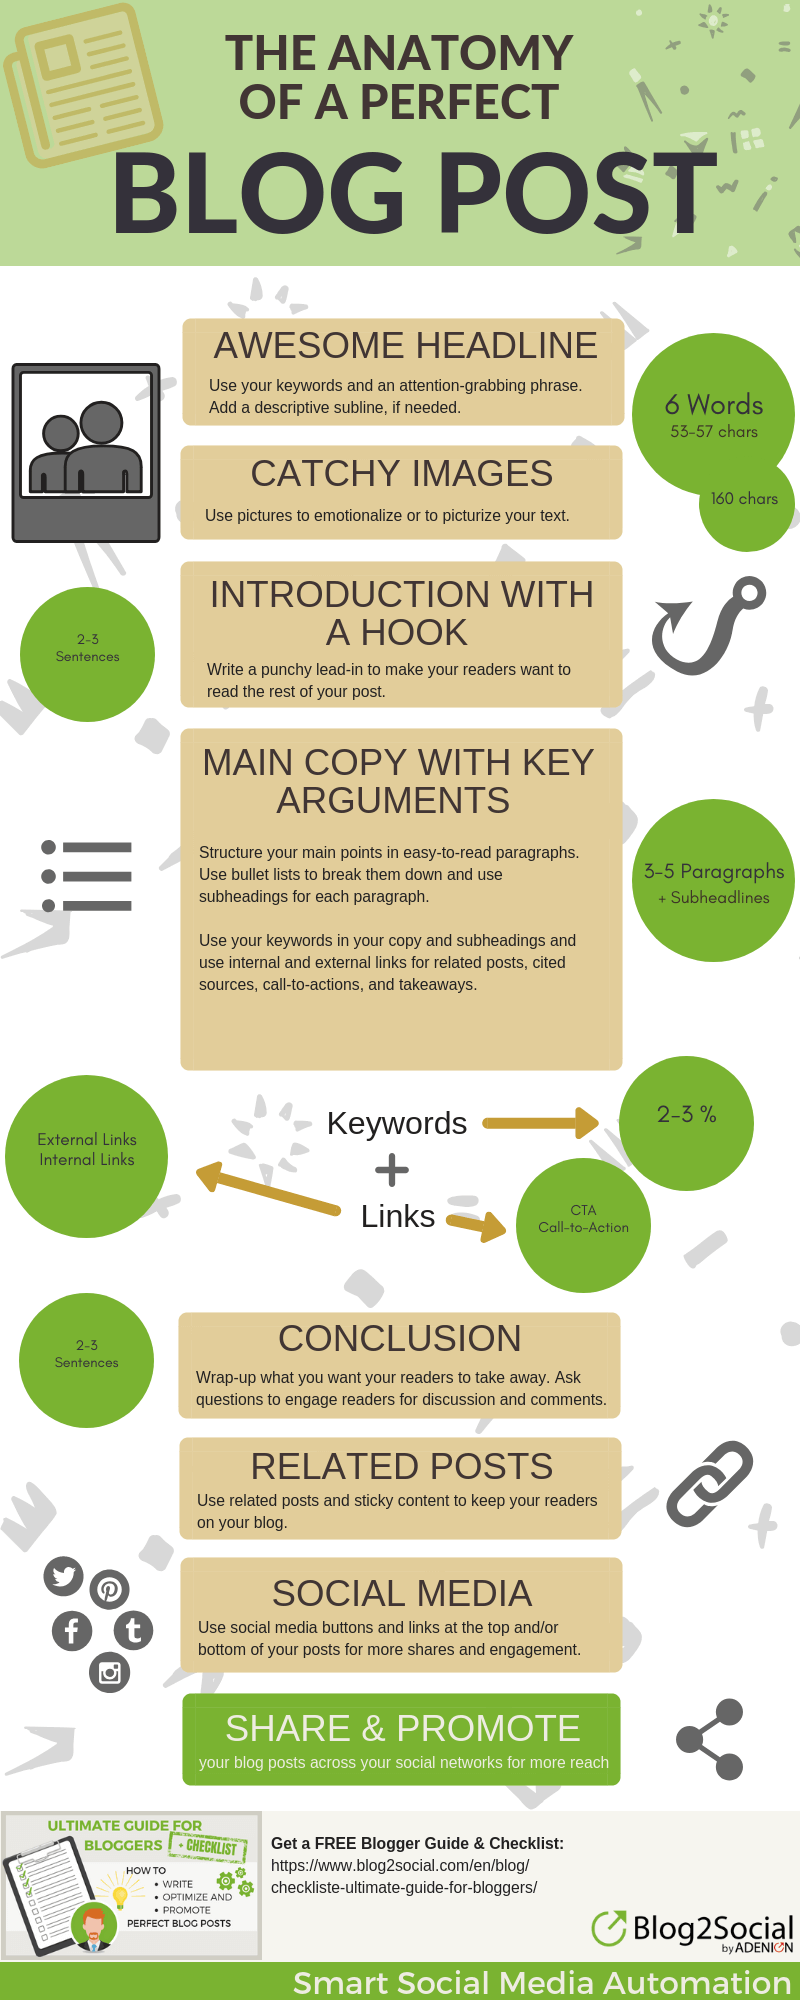
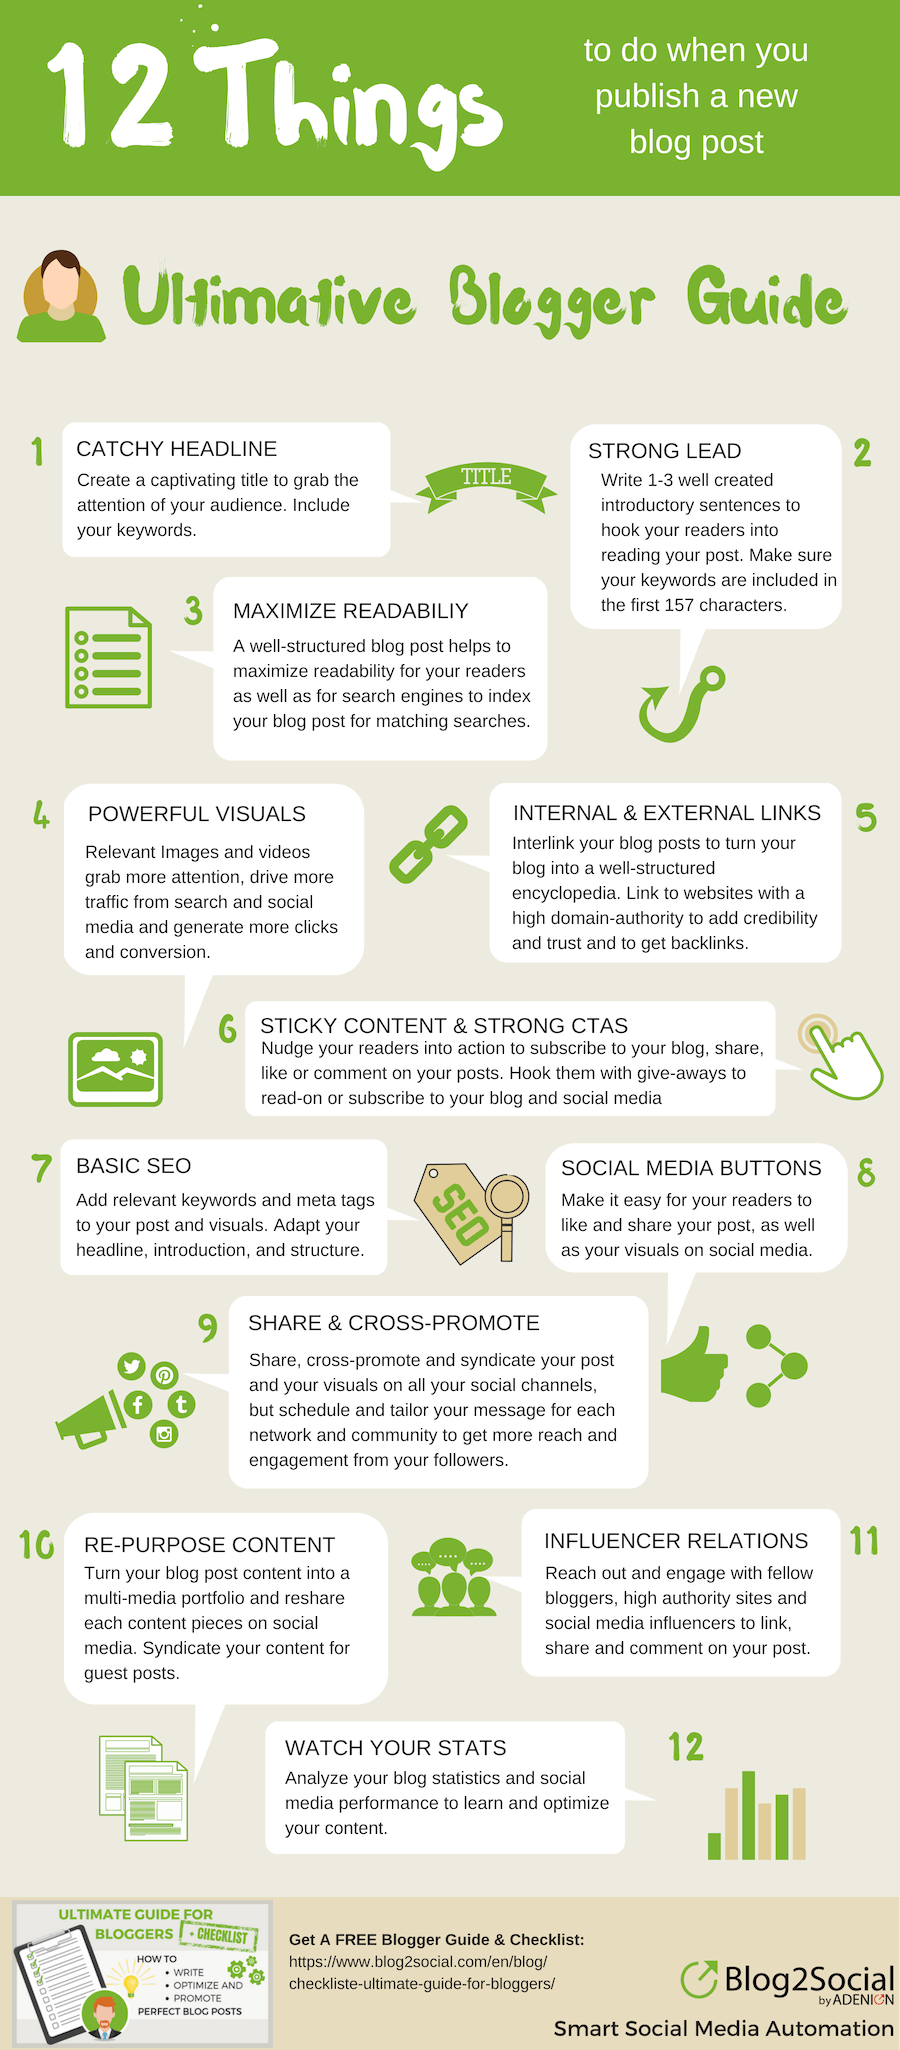
12 Things to do Before & After You Hit the Publish Button for Blog Post
CHECKPOINTS: Before you publish your blog post
# 1 Make Sure Your Blog Post Title is Catchy
Every great blog post starts with a captivating title to grab the attention of your audience. Make sure you have a catchy headline and your introduction will attract your target audience right away. Write something that makes your readers want to read the rest of your post.
Article headlines that are catchy by nature
How To . . . is something many people ask and actually enter as search phrases into the search engines. Use these for basic help content, that gives advice for frequently asked questions or for a Step-by-Step Guide.
Listicles with Numbers: 3,5 or 7 Steps, Tips, Tricks, Tactics, Secrets, Things, Ways, Reasons, or odd numbers like 19, 37 or 101 Ideas, Principles or Facts is always something people like to read and to share.
Strong Adjectives like Effortless, Fun, Incredible, Essential, Killer, Painstaking
Freebies: A Free Checklist, Whitepaper, Step-by-Step guide, Infographic, Template is always tempting
Arguments: Dos and Don'ts, Pros and Cons
Triggers and Promises: What, Why You Should Never . . . , When is the Best Time to. . . , How I Managed to . . .
Best Practice: advice or tips from experts or professionals of the niche your target audience looks up at.
Your Magic Headline Formula
If you are looking for a magic headline formula, try this one: Take your Keywords and then add one or two or three of the following headline catalysts:
Keywords
+ Numbers/Triggers/Arguments/Freebie
+ Strong Adjective
+ Promise/Warning/Best Practice
The perfect SEO blog post title consists of 6-8 word with 54-57 chars and your focus keywords.
When creating your title, always think of the specific audience you want to address and what your targets are most likely to enter as search terms when they are looking for the topic you are covering in your post.
The more specific your topic and title is focused for a specific audience or niche, the more likely it will hit the target. Don't try to reach out for everyone, or you will end with no one.
An example
17 Ways to Grow Your Blog From Top Bloggers, is a blog post title from Social Media Examiner that hits a top position in the search engines when searching for the keywords tips and blog because a lot of bloggers are searching for tips to grow a blog.
Why this headline is particularly good:
It's a listicle post with numbers: 17 Ways which is very likely to hit the search results. Search engines love listicles because people love them.
It includes keywords (“grow blog”), which are search words/phrases the target audience is very likely to search for.
Best Practice: Top Bloggers. Every blogger looks up at top bloggers and wants to become a top blogger himself or herself, so the headline addresses the target audience as well as the target keyword.
Always begin and end every post with a focus on your headline and don’t publish until you've got a catchy headline.
Tools to use for creating perfect headlines
The Easy Blog Ideas plugin analyzes what content performs best for any topic, using social media data. With one click you can either bookmark it or save a draft post that will automatically contain a suggested title and slug.
The Title Experiments plugin helps you to test your titles and discover what your readers find interesting.
Try the Portent Content Idea Generator is a creative blog title idea generator. If you enter a keyword the tool will come out with some serious, some fun and cheeky suggestions. Though you should not take it too seriously, it is worth giving a try, especially if you have a bad day or a writing blockade. However, the tool will inspire you and brighten up your day.
Try the Seopressor Blog Title Generator to get some ideas on creative titles for your blog posts. You can enter and describe your focus keyword and the tool comes up with a couple of strong headline titles surrounding your keyword.
Buzzfeed is a news site for lurid tabloid news. Even if the content of the articles is usually quite poor, you can see from the headlines that it works and let inspire you.
Buzzsumo is a content marketing search engine. You can also search here for keywords and see which headlines get the most engagement on social media sites.
# 2 Write a Descriptive Introduction with a Hook for Your Blog Post
The second most important part of your blog post is your subline or introduction of your blog post, depending on the structure of your article. Eight out of ten blog visitors read your headline, but only two read the rest of your text, depending on how magnetic your introduction is. If your introduction is too weak you will lose your readers right after the headline.
A subline is an extension of your headline adding more important information. The introduction is the first paragraph outlining the topic of your post. Use the introduction to tell the key arguments of your topic without giving away the suspense.
How to create a strong introduction
Start your blog post with:
interesting facts or stats
surprising arguments to raise eyebrows
a controversial argument
a question
telling your readers "Why" you are writing the post, or "What" they learn by reading it
Write 1-3 well created introductory sentences to hook your readers into reading your post. Then make sure your keywords are included in the first 157 characters of your post and meta description.
To make your introduction search engine friendly keep it less than 157 characters. Or write the first 157 characters of your introduction so, that it can double act as meta description snippet. The meta description snippet is the text which is displayed underneath your headline in the search results. Introductions, as well as meta descriptions, can be any length, but search engines generally truncate snippets that are longer than 157 characters. So, make sure to use an introduction long enough to be sufficiently descriptive, but keep it within the 157-character limit.
An Example:
The following guide & checklist helps you to write, optimize and promote your blog posts in less time and for more conversion and traffic on your blog.
(157 characters)
# 3 Maximize the Readability of Your Blog Post
The average attention span of a human reader in today's news media is less than 8 seconds and that is less than the attention span of a goldfish. Most people scan a post to see if it sounds worth reading, and only then they decide if they’ll actually read the whole post. By overwhelming your readers with a wasteland of big text blocks without subheadings, you’re making it quite hard for people to grasp what your post is actually about.
A well organized and structured post is more fun to read. The better you break up and divide your content into smaller sections with strong subheadings the better you help your readers to grasp your content in a minimum of time.
A well-structured blog post helps to maximize readability for your readers as well as for search engines to index your blog post for matching searches.
Perfect length of a blog post
There is no perfect length of a blog post. Short posts can be as effective as long posts, depending on your topic and target. However, the minimum length of a blog post - recommended for SEO - is about 300 words. Everything above 1,000 words is regarded as long-form post.
According to Research by serpIQ Google ranks content that has more than 2,000 words better than content with fewer words. Research by Moz shows that articles with 3,000 – 10,000 words get twice as many shares than content with 1,000 words. With 4,000 to 8,000 words, you will hit the average of an in-depth blog post.
Whatever the length of your blog post, make sure you're addressing your main keywords throughout your text and you organize your content well.
How to bring your copy into easily digestible titbits
Keep your post as short as possible and as long as needed to get to the bottom of your topic.
Create strong subheadings focusing on a single aspect of your topic, including top keywords.
Organize your post in sections with less than 300 word each and add a strong subtitle to each paragraph.
Keep each paragraph with less than 150 words.
Use italics and bold to highlight important sentences, keywords or important terms, but don't overuse it
Include lists with bullet points to stress your key facts and tips.
Keep your sentences short and easy to understand.
Use a language that meets the linguistic usage and tonality of your target audience.
Always proofread your blog post and check for grammar and spelling mistakes.
Tools to use for checking the readability of your blog post
Use the Yoast SEO plugin to help you with a basic readability checker for your text structure (free & premium)
Try the Hemmingway app to check the readability and your style on a wider scope (free)
Use Grammarly to eliminates grammatical errors and spelling mistake and enhance your writing (free & premium)
# 4 Use the Power of Images and Videos as Visuals for your Blog Post
“A picture is worth a thousand words”. That's old knowledge, but images and videos have never been more important than in the age of social media. For statistical proof, take a look at Hubspot's collection of stats on the importance of visual content.
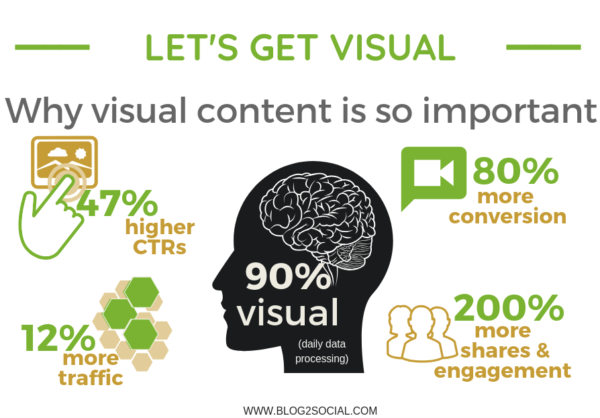
Photos, infographics, diagrams, charts, tables, screenshots, slides, and videos can help your readers understand abstract ideas or complex topics. By using visual media, the readers will understand better the concepts that you are demonstrating.
However, your image should always be relevant to your topic and directly relate to the context in which they appear.
Images and videos also help you grab a lot of traffic from image search engines like Google image search or YouTube. And, they will compel users to share your content on their social networks. Images and videos also help you to drive more traffic from social media sites to your blog or website.
How to use images and videos for your blog post
Include at least one image near to the top of your post.
Always include keywords in image names or video titles, image’s Alt tags and description.
Define your featured image with a strong and descriptive visual
Tools to use for creating awesome images, infographics, and videos
Use Canva to create super fast and easy visuals and infographics for your blog posts. Canva offers a huge variety of templates, layouts, photos and icons you can use to create professional looking images. (free & premium)
Try Movely to create animated videos (starting from $ 5 per month)
Use the SEO friendly images plugin for your blog to automatically update all images with proper ALT and TITLE attributes for SEO purposes. Additionally, this makes the post W3C/xHTML valid as well. (free & premium).
Try Zara4 image compressor as a web app or as a plugin to compress your images in order to reduce the impact on page speed.
#5 Use Internal and External Links in your Blog Post
Links are the backbone of the internet and so are links for your blog posts. Interlinking your blog posts turn your blog into a well-structured encyclopedia on your topic. External links connect your blog to the blogosphere and provide the backlink structure for your blog.
Use internal links to your past posts, when you are referring to a topic you've written about before. This both gives your readers more information about your topic, but it also hooks people to your site. Linking to related posts will make your post stronger because it shows some authority on the subject.
Internal links for your blog posts
Your internal link structure is also important for your ranking in the search engines. Read Yoast's post on how to use cornerstone articles, if you want to know more about this.
How to use external links in your blog post
Use at least 1-2 internal links to link to a past post.
Write a descriptive anchor text for the link to make it clear where the link leads to.
Always use keywords in your anchor text.
Only use links that are relevant to your current topic.
Don't use too many links to irritate or mislead your readers.
External links for your blog posts
Also use external links to other posts, if you are citing or referring to a topic someone else has written before. If you quote content from key influencers on your topic and link to their site, you automatically give credit to their websites. You can also use this to reach out or automatically ping their website. If they like what they see, they may be willing to share your content or link back to you.
How to use external links in your blog post
Use at least 1-2 external links in your blog post.
Only link to websites or articles which actually add value to the topic you are writing about.
Link to websites with a good page authority or domain authority. Look out for influencers in your industry or in your niche.
Tools to use for internal and external link strategies
Use the WordPress default feature to interlink your blog posts. When you select a text and click on the hyperlink symbol to add a link, you can search for your published posts. You can select your post and link it directly with anchor text. Or, you can search for your blog posts by keywords.
Try the Internal Link Generator plugin to automatically create links and anchor texts for your blog posts.
Check the domain authority for your external links with Moz open site explorer.
#6 Use Strong Call-to-Actions to Make your Readers Stick to your Blog and to Generate Leads
Once you have managed to drive people to your site, you want them to stay as long as possible. You need a strong call-to-action leading your readers to take an action after they finish reading your blog post and before leaving your site. The best way to do this is to guide them to further readings on your site. Also, ask them to comment on your post or to discuss their opinion on the topic.
To collect your readers' e-mails and to generate leads to follow-up, invite your blog visitors to subscribe to your blog or take away some bonus material by leaving their e-mail address. Most people need a little nudging for doing something. So, if you want your readers to do something before leaving your site, then say so with a strong call-to-action (CTA).
How to hook your headers to your blog
Link to other related posts on your blog at the end of each post to make your visitors read on and browse your site.
Add a question at the end to encourage your readers to comment on your post or discuss your topic.
Invite your readers to subscribe to your blog.
Encourage your readers to subscribe to your social channels.
Provide a free download to let your readers take away something from your blog, a white paper, a checklist or an ebook with additional help content to follow up.
Tools to use for sticky content and inbound leads
Use the Icegram plugin to collect leads with all kinds of forms you can create for your blog, white papers, checklists or ebooks. (free & premium)
Use the Email Subscribers plugin to get your visitors to subscribe to your blog. (free & premium)
Try the Related Posts for WordPress to automatically show related posts at the end of each post without any impact on your page speed. (free & premium)
Get the Content Aware Sidebars plugin for your blog to add sticky content to the eye of your readers. This plugin lets you display custom sidebars on any post, page or category of your blog. This helps you to display content specific adds or offers to your sidebar for different contexts. The sidebar manager lets you create post sidebars, page sidebars, category sidebars and more. (free & premium)
The Broken Link Checker plugin will help you analyze your blog posts for broken links and to fix them again.
#7 Optimize your Blog Posts for SEO
Just remember, everything you learned in #1-6 will make your blog post SEO-friendly. If your target audience likes your post, the search engines will love it. However, there are still some more steps you should take for better matching search results.
You don't have to be an SEO professional to tackle SEO. Some minor adaptions to your text and structure will suffice to make your post readable and searchable.
There are basically two major principles for a top ranking in the search engines:
valuable content that attracts your target audience,
relevant keywords that meet the search terms of your target readers.
How to optimize your headline and introduction of your blog post for SEO
Use keywords your target audience actually uses for searching when looking for information on your topic. Integrate your keywords in your:
headline / title
introduction / lead
subtitles
copy
images and videos
links and anchor texts
Make sure title and introduction meet the requirements for the 'title' and 'meta description' displayed in the search engines:
Write a title with less than 57 characters and include your keywords. This makes sure your title is properly displayed and gets not truncated in the search engines.
Make sure the first 157 characters of your introduction cover the essence of what your post is about and include your focus keywords so that it can double-act as meta description and snippet for your post.
Tools to use for SEO optimizing your blog posts
Use the Yoast SEO plugin to help you with basic SEO-optimizing your blog and your posts. (free & premium)
Try keywordtool.io or ubersuggest.io to find keywords related to your topic. (free & premium)
Use the SEO friendly images plugin for your blog to automatically update all images with proper ALT and TITLE attributes for SEO purposes. Additionally, this makes the post W3C/xHTML valid as well. (free & premium)
#8 Make it Easy for your Blog Visitors to Follow, Like and Share your Blog Posts and Images
In order to connect your blog to your social media profiles, you should make it easy for your visitors to follow you on your social channels and share your blog posts and images to their own communities.
Placing social media follow buttons on your site can increase the number of followers on your social profiles. Placing social media share buttons at the top and at the bottom of each post will encourage your readers to share your post. Also, encourage your readers to share your images.
If you have an infographic, invite your readers to share them or embed them on their blogs by displaying the embed code.
Always use strong call-to-action like "please share" to nudge them into action.
How to encourage your visitors to follow, like and share your blog posts and images
Add social media buttons for your social channels at the top of your blog, in your footer and on your contact page and add call-to-action: Follow me.
Add social media buttons and bars at the top and at the bottom of each blog post.
Use social media buttons on your images.
Display an embed code for your infographics and invite your readers to share (see an example).
Always use strong call-to-actions as please follow, please share.
Tools to use to make it easy for your visitors to share your posts
Try the Simple Social Icons plugin for your blog to display simple social media icons to follow you on social networks. (free & premium)
Use the Better Click to Tweet plugin for your blog. The plugin adds ready-to-use Twitter boxes to your posts or pages. (free & premium)
Try the GetSocial Social Share Button or the Social Warfare plugin for your blog to add social media buttons to your post. There are multiple design options to choose from more networks, designs and analytics options. (premium)
Get the Pinterest Hover Pin It Button plugin for your blog to make your blog post images pinnable (free)
Use the WWM Social Share On Image Hover for your blog, if you want to offer your readers more options to share your images on social media. The plugin adds 6 social media icons on your blog post images: Facebook, Twitter, LinkedIn, Google+ Pinterest, and Tumblr. It will show the social media icons automatically on hover the post images on your site. (free & premium)
CHECKPOINTS: After Hitting the Publish Button
#9 Cross-Promote your Post on Twitter, Facebook, Google+ and other Social Media Platforms
Once you have published your new post, you will need to promote your post as hell. Start by sharing your blog post on your social channels. Social media are very powerful sources to get more outreach for your content and to drive traffic to your blog.
However, each social network offers different options for promoting your content. Not only the number of characters allowed differs and image sizes vary. The communities react differently to post formats. Each network is used for different purposes and at different times.
In some networks, you can join current discussions by adding popular hashtags. Hashtags also turn your posts into searchable content. Or, you can add @ handles to reach out to specific users. Or, you can add emojis to personalize your posts with emotions.
Hashtags work fine for Twitter and Instagram, but they perform less on Facebook and LinkedIn. You may also need to address your LinkedIn business contacts in a different way than your Facebook friends.
To effectively cross-promote your blog post, don't just cross-post the same message on every social network. Tailor the message for your posts to fit each social media platform and audience. Get the Complete Guide to Social Media Sharing: What, When & How to Share to help you set up your cross-promotion plan.
How to cross-promote your blog post on social media
Share your post on Twitter, Facebook, Google+, and LinkedIn.
If you have business pages on Facebook, LinkedIn, and Google+, share your posts to your pages as well but at different times and days.
Also share your blog post to relevant groups and communities on Facebook, LinkedIn, and Google+, but share them on different days and times and use different messages tailored for each group.
Schedule your post multiple times on Twitter.
Share your blog post images on Pinterest, Instagram, and Flickr, using your focus image with your introduction, hashtags and a link to your post.
If you use multiple images, share them all, but share them on different days and at different times.
You can also share your images on Twitter, Facebook, LinkedIn, and Google+ to re-share your posts with different visual anchors.
Share your blog post in special interest communities such as Reddit.
Also share a link to your blog post to social bookmark networks such as Diigo, Digg, StumbleUpon.
Schedule your posts at the best times for each network and across several days, weeks and month to extend the lifespan of your posts.
Re-share and re-schedule your evergreen posts from time to time to revive them.
You can do this manually or automatically. If you do it manually, this will be a lot of legwork, every time you publish a new post. Social media automation tools save a lot of time and help you to get more outreach for your post in less time.
Tools to use for sharing your content automatically on social media networks
Use the Blog2Social plugin to share and cross-promote your blog posts automatically to your social media channels, directly from the WordPress dashboard. The plugin allows you to auto-post and to customize your posts individually for each network. You can also schedule your posts to be shared at the best times to post on each network.
The plugin auto-posts your blog posts to Facebook (profiles, pages, groups), Twitter, Google+ (profiles, pages, groups), Google My Business, LinkedIn (profiles, pages), XING (profiles, pages, groups), VK, Instagram, Flickr, Pinterest, Diigo, Reddit, Tumblr, Medium, Bloglovin', Torial.
You may also re-post old post and pre-schedule your scheduled post for auto-posting.
Syndicate your Content on LinkedIn Pulse, Medium, Tumblr, Quora
There are several other social sites with large communities and high authority, where you should consider to syndicate or re-publish your content. Exposure to these audiences benefits your visibility and outreach. You can syndicate your content as a complete copy of the content on your site, or only a part of it.
Whatever you do for syndication, always make sure to re-publish your content a couple of days after you published the content on your blog. This allows the search engines to index your content first as original content.
How to re-publish and syndicate your blog post
Re-publish your post in blogging networks such as Medium, Tumblr or Bloglovin.
Re-publish your content on Torial if it is relevant for journalists.
Syndicate your blog post to LinkedIn Pulse, if it is business-related.
Syndicate your post as a blog post to Quora.
Tools to use for re-publishing your content automatically on social media networks
You can use the Medium plugin to automatically re-publish your blog post on Medium
Use the Blog2Social plugin to re-publish your blog post to Tumblr, Medium, Torial automatically. The plugin provides a full Rich Text Editor for these networks, so you can optionally edit your title and copy or even change your image if needed. And, most importantly, you can schedule your post to get them re-published on different days and times.
#10 Re-purpose Your Content
Once you have put so much effort in creating a valuable blog post, you should make the most of your content and re-purpose the content as much as possible.
There are several other media formats you can make use of and easily create a multimedia portfolio for your content. Each single media format can then again be cross-promoted on social media to catch as many eyeballs as possible for a single piece of content.
How to recycle your blog post for multiple media formats
Turn your key facts and images into a slideshow and share it on networks like Slideshare, Scribd
Screencast your slideshow into a short video clip with a link to your blog post and share it on YouTube, Vine & Co.
Add voice to your post and turn your blog post into a podcast. Add it to your blog post for readers who prefer to listen rather than to read and share it on sites such as iTunes, Google Play Music, Stitcher, PocketCast.
Turn long posts into a white paper or ebook as a take-away for your blog and to share it on Slideshare, Scribd, Issue & Co.
Write a checklist for your post as take away and share them.
Create an infographic for your post and share them.
Use these repurposed content media also to re-share your post on your social media channel on Twitter, Facebook, Google+, LinkedIn and Co.
Repurpose your content for guest posts on other niche related sites
Tools to use for repurposing your content in other media formats
Use Powerpoint or Google Slides to create a simple presentation of your blog post. You can create an mp4 or .wmv file to use them as video.
Use Prezi to create vivid and animated slides
Create a screencast with Camtasia if you need more options and editing.
Use Audacity for creating a simple podcast
# 11 Reach Out to Influencers to Network for Your Blog Post
Reaching out to influencers and fellow bloggers is most important to build up your network to get more outreach, authority, reputation, and valuable backlinks for your blog post.
How to reach out to influencers
Start with websites you use for your external links. Reach out to the bloggers and tell them you referred to them.
Invite fellow bloggers you know to comment on your blog post, ask for their opinion.
Look up your keywords in the search engines and comment on other topic-related blogs posts and link to your post to generate valuable backlinks. But do so only if your post really adds value to what it said.
Tools to use for reaching out to influencers
Use the Buzzsumo search engine to look for related posts on your topic.
Use networks like Kred orKlout to find influencers in your niche and topics by keyword search.
#12 Watch Your Blog Post Stats
Keeping track of your blog post stats and social media performance is crucial to get a better grasp of your audience's preferences and makes it easier to create content that performs best for your blog.
The easiest way to do so is to open the Google Analytics dashboard to look at your blog stats. The statistics show you the page views and performance of your posts, but they also show where your website visitors come from, how long they stay on your page. So you can see, if users stay to read or if they exit after a few seconds if the browse your site and where they exit.
Also, your social media statistics are important to see how many comments, likes and shares your posts get. Whereas people are easy on giving a like, the number of shares show if they really value your content to share them with their own community. Comments on your post show that they actively interact with your content.
Stats to watch
Analyze your blog post stats for page views, page count, and reading time.
Watch your blog for comments on your post and reply to each comment in time.
Keep track of your counts on blog subscriptions and leads for download material.
Watch your social media statistics for likes, shares, and comments.
Tools to use for easily analyzing your blog post stats
The plugins Google Analytics Dashboard, Google Analyticator or Google Analytics Dashboard for WP bring the Google Analytics directly into your WordPress Dashboard. You can easily integrate the Analytics code into each page and post of your blog. If you’re regularly checking your stats on page views and performance of your posts, the plugin helps you keeping track of your stats more quickly and conveniently.
The Wassup plugin helps you to analyze your blog post traffic with real-time stats. It shows lots of detailed chronological information, customizable tracking, live views, visitor and pageview counts, top stats, charts, IP geolocation, map, two aside widgets, and a dashboard widget.
Try Crazy egg to visualize where your visitors click on your blog and your post.
Try SumAll to leverage your social media data to create data-driven content.
Conclusion
As you see, there are many things you can do to make the best out of your blog post. And a lot to think about, every time you publish a new post: From creating to streamlining your content for your readers. From search engine optimization to marketing. All these aspects are important to make your blog post successful and to bring more traffic to your blog or website. Smart tools help you to get most of your tasks done fast and easily, so you can focus on your content and your readers.
Take this guide as your writing system and the checklist will help you to quickly and easily work through all the checkpoints for your post optimization & promotion work every time you create a new blog post.
Download this guide and a free checklist to make you have everything in place for writing and promoting your next blog post.
Download the Ultimate Guide for Bloggers
Read the full article